Sunday, 24 February 2013

User Profiles on your Android Device

User Profiles is an easy way of choosing how your Android phone responds to an event, which could be an incoming call, an incoming text (SMS) and other notifications on the device.

From the Home Screen, launch 'Settings' application and choose 'User Profiles'. We have given a couple of screen shots here to assist you in familiarizing yourself with what the screens may look like on your phone -

The 'Settings' menu -

'User Profiles' Screen -

Once within the User Profiles screen, you should see options to Add a new profile (by clicking the + sign on the bottom left of the screen) or 'Modify' a pre-existing profile to suit your needs. To modify an existing profile, choose the profile and change the settings on the screen that pops up.

Lets explore what you will see on choosing the 'General' profile -


The Profile options may vary based on make and model of the device your are using, however, the most common options are -
  • Vibrate – This is choose if your device should vibrate on receiving a call, an SMS or on other system notifications
  • Volume – This option helps you select different Volume levels for Ringtone / notification, other applications and alarms
  • Ringtone – You can set the ringtone of your choice from here. Usually Dual SIM phones will also allow you to set different ringtones for the two SIMs

In the next article we will explore the Display settings on your device. Stay Tuned!!

For more fun and facts about Android, join us on our Facebook - 

www.facebook.com/blogadroid 

Sunday, 17 February 2013

Wi-Fi and Bluetooth on your Android Phone


Today, let’s explore a couple of wireless connectivity options for your Android device. The most common connectivity modes used are Wi-Fi and Bluetooth. To establish any kind of connectivity, you will need to turn ON the concerned phone feature, usually found under the Settings menu.

From the Applications screen choose Settings and then choose Wi-Fi. As you can see in the picture, Wi-Fi is turned off on this device. Switch it on so that it searches for the available Wi-Fi connections within its range. You would see a screen like the one shown below, with a list of available connections your phone can connect to.

In most cases, the Wi-Fi connections are secured through WEP or WPA2 and on choosing to connect with such a network, you will get prompted to enter the necessary key/password. In case you don’t have one, contact your system administrator / Internet company for the password.

Micromax A110 Canvas 2


In case you don’t see the network you want to connect to, press the SCAN button to again search for available wireless connections.

Samsung Galaxy S3


You can customize the Wi-Fi settings on Samsung galaxy S3, follow the simple steps below.

In the application list, select Settings, Wi-Fi, and then Advanced. You can change the following options:

Network notification - Set the device to notify you when an open Wi-Fi AP is available.
Keep Wi-Fi on during sleep - Set whether or not to keep the Wi-Fi feature active in Sleep mode.
Check for Internet service - Set to check if you can access Internet services while using the current AP.
MAC address - View the MAC address.
IP address - View the IP address.

Bluetooth allows you to connect to any other Bluetooth enabled device. The Bluetooth range, however, is much shorter than Wi-Fi, lasting typically only for a few feet. Bluetooth is commonly used for sharing files or connecting with other devices for their feature sets like a wireless Bluetooth headset.


Bluetooth Status Indicators

The following icons show your Bluetooth connection status at a glance:

 Displays when Bluetooth is active.


Displays when Bluetooth is connected (paired) and communicating.


In the coming days we will understand how to track Data Usage on your device and how to personalize the phone. Stay Tuned…!!


For more fun and facts about Android, join our Facebook page. Android Fun with Blogadroid

Sunday, 10 February 2013

SIM Management on your Android Phone

Continuing from where we left and sticking to the promise that was made to visit the Settings menu in greater details, in this post, we will further explore the 'SIM Management' option which we saw under Settings. As the name suggests this option will help you configure the SIM(s) on your Android device.

Let's look at what comes up when we choose the SIM Management option -


We have marked up various options in this screenshot with RED colored numbers, to help correlate with the corresponding write up below.

Note - We have again taken an example of a dual-SIM phone here. You may ignore the sections of this post which pertain to SIM 2/SIM SLOT 2. This post may not wholly or partially apply to your single SIM Android device.


  1. This is the SIM in SLOT 1 of your phone. By default the SIM name would be the same as your Service Provider’s name, though this can be modified. We will look into how this can be done a little later in this post.
  2. This is the SIM in SLOT 2.
You can have the SIM’s switched ON or OFF using the individual toggle switches as seen in the picture. 

  1. This option allows you to choose the default SIM to be used for making Voice Calls, unless you have chosen the option “Always ask” in which case you will be prompted to choose the SIM for every call you make. SIM 1 is chosen by default. In this case, we have renamed SIM 1 to 'Personal'.
  2. This option gives you the same choice as explained in point 3, but for Video Calls instead of Voice Calls.
  3. Through this option, you choose the default SIM for sending messages. Again, you have the option to choose 'Always Ask', if you wish so.
  4. Similarly, option 6 helps you choose the SIM that would be used for connecting to Internet. This may come in handy if you are on roaming and possess SIM cards for 2 different states/countries. In this example SIM 1 has been set as default.
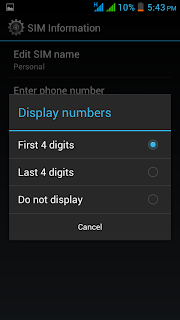
Now we will see how one can go about editing these settings. For the purpose of our example, we will make the edits on SIM 1.


Editing SIM Name and Phone Number


Other available options


Choosing Voice Call Default

Choosing Video Call Default


Choosing Messaging Default


Choosing Data/Internet Connection Default


In the next post we will visit the options available to us for making Bluetooth and Wi-Fi Connections.

Stay Tuned!!
For more fun and facts about Android, join our Facebook page. Android Fun with Blogadroid

Saturday, 9 February 2013

A Look at Your Android Phone Home & Settings Screens


Today, let’s try to explore the Home Screen and Settings menu on your Android device. To help you understand the icons, features and the setting options, we have picked on Micromax A110 Canvas2, one of the most talked about entry level phones. Another reason for us to hone in on this device was because of its dual-SIM feature. 

Now, as we have discussed in the past, the way the screens and the menus show up on your Android phone are dependent on the level of customization the device manufacturer has done with the Android platform, however, you should invariably find the options we have explained in this article on your device. Although it may seem redundant, I have still taken the liberty to give a note of caution below :-).

Note: The Screens may differ depending on the make and model of your Android device.
<!--[if !vml]--><!--[endif]-->


<!--[if !vml]--><!--[endif]-->
This should be the first screen to appear when you bring your phone out of Sleep Mode.

The labels (in RED font) shown in above screenshot are explained below - 

1 - This icon indicates the signal strength for the Primary (SIM) network. Note - Primary SIM is the SIM card which is installed on Slot 1 of the device.
2 - This icon indicates the signal strength for the Secondary (SIM) network. Note - Secondary SIM is the SIM card which is installed on Slot 2 of the device.
3 - This is the charge percentage indicator, which displays the percentage of charge left in the battery at that time. Needless to say, you will observe a varying % charge indicated by the icon at different times depending upon the actual charge left in the battery at that time.
4 - This one goes hand-in-hand with icon 3 and in some devices you may find only one of these icons. Instead of a % display of the charge left, this icon tries to do a visual representation of battery charge.
5 - A display of the current time set on your device.
6 - Date set on the device, First Alarm Notification (you could have multiple alarms if they are set). In case of Battery Low, the device will notify you to Connect to Phone Charger (as shown in the picture).
7 - Screen locked icon. Swipe the icon to unlock the phone. (This may vary depending upon your settings, for e.g. you may have set a Pattern or Code to Unlock).
8 - Your Primary SIM Service Provider and the current cellular network your device is connected to.

Once you unlock your device you should arrive at the Home Screen, which may appear like the one shown in the following picture.


<!--[if !vml]--><!--[endif]-->
Icons appearing on the Home Screen will vary depending on the applications you use frequently or have pinned to the Home Screen. More about how to exploit these settings and customize your Home Screen will follow under a different blog post.

For now, lets get an overview of what the options really mean.

1 - SIM Management: This Option allows you to personalize your SIMs in Slot 1 & Slot.
2 - Wi-Fi: This will allow you to manage your Phone to connect to surrounding Wi-Fi connections and hook on to the Internet.
3 - Bluetooth: This Option will enable you to connect to other Bluetooth devices like your Car Stereo, Laptop or another Phone. Bluetooth connections provide a convenient mode to share files or use wireless (Bluetooth) headsets.
4 - Data Usage: This Option allows you to keep a tab on your device usage. Metrics like Internet usage (data transfers), SMS and Call statistics are easily found under this option.


To open the Settings menu, you can either select settings icon from your home screen ,if you have one, or  select the Apps icon and then look for the Settings Icon. You may need to
slide left or right on your screen after selecting Apps icon to locate the Settings Icon.

This is how the Settings menu looks like on the device we have chosen for this blog entry.


Well, this was a pretty basic overview on your phone's Home Screen and Settings menu. In the coming articles we will explore these menu options and other customization tips in more details. Do leave a message on our post if there is anything that interests you and you would like to see on our blog.


Stay tuned!!


For more fun and facts about Android, join our Facebook page. Android Fun with Blogadroid

Saturday, 2 February 2013

Getting Started with your New Android Phone


Starting up your Android Phone first time….!
Excited about buying your new Android Phone..? Well you should be. Let’s look at what happens when you switch on your Android Phone for the first time. The first screen that appears when you turn on your new Android device usually varies depending upon the device make and model and the customizations the device manufacturer has done to the operating system. Most manufacturers today have defined their own templates making it difficult to freeze on a particular screenshot. We will take a look at a couple of them here.
When you boot up the phone for the first time (usually by pressing down the power button for a few seconds), it will prompt you for a few necessary settings such as language settings, time and date settings. After you make appropriate choices for these settings, it will ask for your Google account details. If you don’t have an existing Google account, we recommend signing up for one at this stage. Needless to say, an Internet connection is mandatory to perform this step. Alternatively, you may choose to skip this step and add the Gmail account details later. A note of caution is that Google Account is needed for browsing the Android market store Google Play and downloading applications from the store.
This is how you may expect the screens to look on a Samsung Galaxy S3 –


(Picture Source - http://sharetel.com.au)

For HTC users, we would recommend a visit to this link (HTC One X) – HTC One X

Android devices usually come with a number of pre-installed Google applications like Google Maps, Google Navigator, Gtalk, Gmail &  the application market ‘Google Play’ that brings to you more than 675,000 Applications, paid & free.
Locate the Android market in the Applications section. It is called Google play in most versions of Android. The first screen launches a wizard that helps you configure your Google Account for access. The Wizard starts with a provision to either login using your existing Google Account or helps you create one. To create a new account would require your First Name, Last Name and desired Gmail ID. The name selected for the account would be your future Gmail login ID which will be verified for availability with Google Servers, the moment you select next. Having an account created or signing in using existing account requires Internet connectivity, and will take a few minutes to verify and activate the play store.
Once the account is created or an existing account activated, you can now download free or buy paid apps from Play Store. The beautiful part of having your Gmail ID synced with Play store is, whenever you login into your Gmail Account from your desktop and jump to Play Store, you can view the number of handsets configured with your Gmail ID and the applications currently installed on them. We will explore this in more details in the near future.

Happy browsing an exciting world of apps on the Play Store…

For more fun and facts about Android, join our Facebook page. Android Fun with Blogadroid